Theories on how best to fix this vary, some people say since the joint moves, the fix should be flexible putty, others have tried epoxy filler to seal up the crack. Below is a shot of 88's crack, it's not as bad as some, but its definitely there and it was definitely annoying me to look at it.

The fix we're trying is a bit more involved, but hopefully more permanent. Im going to grind the area around the keel seam, and cover the seam with fiberglass and epoxy, then fair and repaint. This will sheathe the seam instead of trying to fill it, and hopefully banish the cracks. This is the one fix all three of my Shields repair/fiberglass people agree on!
To start out, I had to get rid of the paint over it. Easy way would be to sand it off, but since this is bottom paint and the boat is inside, I didn't want to throw copper dust in the air.
I decided to try the soy strip on a large area and see how it went. This stuff is great! Here's how it went:
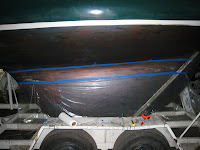
First I masked off the keel, with a 7" gap left open over the seam. I taped plastic sheet to the bottom of the masked area and draped it over the trailer. I used the plastic to protect the lower keel from drips, and to catch the scrapings which would (hopefully) be falling off.

The soy strip is pretty odorless, and looks a lot like honey in consistency. I brushed it on pretty thick, and it hangs well on the vertical surface. I probably had about 1/8" thick layer on the keel.

Within about a half hour, the paint was lifting right off! I was really impressed with this and couldn't help scraping a section. It came off really easily, but I figured it could only get better with a little more time so I reapplied and walked around the yard to measure other Shields for waterline locations.

I gave it about 2 hours, and started scraping. The paint came off in sheets from the deadwood, and was only a little more stubborn coming off of the bottom of the hull. The difference between the two was that the deadwood had been repainted at some point and had a barrier coat primer, and the hull was gelcoat under the VC17. Even on the gelocat the paint came off with one or two good scrapes. To scrape off a 7"x6' area took about 5 minutes.

When it was scraped I washed with water, then acetone to take off any tenacious globs of paint, and the water again. All the mess did indeed land in the plastic and tossed away.

When I was done I took a step back, and was pretty pleased with the way I had just taken a pretty ok looking bottom and made a great big ugly stripe across the bottom. As you can see in the photo, theres quite a lot of different paints and materials left underneath, as people have tried many times to fix the keel joint. Hopefully my fix is the last!
Whats next is to grind out the seam, wide and deep enough for a couple layers of fiberglass cloth tape to be epoxied in, then fill and fair, barrier coat and in spring repaint. The rest of the bottom is in really nice shape except for the fairing strips, and can be wetsanded and repainted.
Oh, and Niki's parents stopped by to see the boat yesterday. In this photo I asked them to give me a skeptical look for us buying a boat. They don't look too skeptical, so I will assume they think it's a great idea!

No comments:
Post a Comment